

How to add new tabs to the ERP Ribbon with Visual Studio?
This document describes the steps necessary to add new menus to the ERP ribbon. This mechanism is an alternative to the using user menus, as it gives the organization total control over the several options of the external application. This allows for the creation of multiple tabs and groups that enable you to organize operations according to their function. Unlike user menus, operations created with this technology do not implement the ERP security mechanism automatically, which means it is not possible for the administrator to define by profile who has access to the operations. To overcome this situation it is necessary to create an administrator extensibility project and define permissions for the operations available in the ribbon. This option is the most suitable when you want to create an extension that adds a new functional area to the ERP, without being dependent on creating user menus manually. Requirements 1 - After opening Visual Studio, select File > New > Project. After creating the project, you need to add a set of references to the extensibility platform. This will allow you to subscribe the DepoisDeCriarMenus event, exposed by the platform, which will be used to build the new menu. 1 - Rename the class from 'Class1.cs' to 'PrimaveraRibbon.cs' 4 - In the body of the created class write override and press TAB. A list will be displayed with all the events you can subscribe. In this case, select the DepoisDeCriarMenus event and add the following code: /// // Create a new TAB. // Create a new Group. // Create a new 32x32 Button. /// /// 5. Compile your solution in BUILD > Build Solution. 6 - Register the assembly as described in 'How to register extensibility projects?' With the Administrator's extensibility technology you can define permissions for the application's operations and whether the user has access to the selected operation. Validate operation permissions Validate dynamic permissionsStep 1 - Create the project
2 - In the window on the left, choose your development language (C# or VB)
3 - Select the Class Library (.NET Framework) project type.
4 - Assign a name to the 'Primavera.CustomRibbon' project and press OK.
5 - Select the project properties and, under Project > Properties > Resources add an image for the button.Step 2 - References
Step 3 - Create the ribbon
2 - Add the following namespaces at the beginning of the class, using the using instruction.
3 - After the class name add Plataforma. This step indicates that our class will inherit all methods, properties and attributes from the Plataforma base class.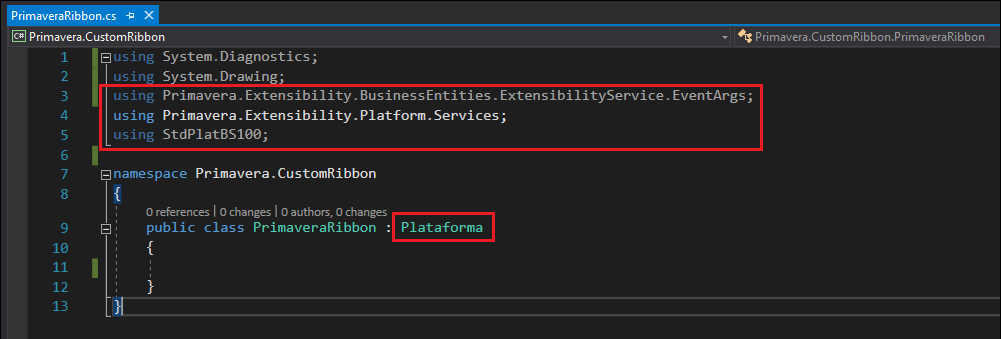
using System;
using System.Diagnostics;
using System.Drawing;
using Primavera.Extensibility.BusinessEntities.ExtensibilityService.EventArgs;
using Primavera.Extensibility.Platform.Services;
using StdPlatBS100;

namespace Primavera.CustomRibbon
{
    public class PrimaveraRibbon : Plataforma
    {
	const string cIDTAB = "10000";
	const string cIDGROUP = "100001";
	const string cIDBUTTON1 = "1000011";
	const string cIDBUTTON2 = "1000012";

        private StdBSPRibbon RibbonEvents;

        ///
/// This event will execute for all ribbon changes.
///
public override void DepoisDeCriarMenus(ExtensibilityEventArgs e)
{
// Register the Ribbon events.
RibbonEvents = this.PSO.Ribbon;
RibbonEvents.Executa += RibbonEvents_Executa;
this.PSO.Ribbon.CriaRibbonTab("TAB", cIDTAB, 10);
this.PSO.Ribbon.CriaRibbonGroup(cIDTAB, "Group 1", CIDGROUP01);
this.PSO.Ribbon.CriaRibbonButton(cIDTAB, CIDGROUP, cIDBUTTON1, "My Button", true, Resource.button1);
} /// Ribbon events.
///
///
private void RibbonEvents_Executa(string Id, string Comando)
{
try
{
switch (Id)
{
case CIDBUTTON1:
//Call action.
break;
}
}
catch (System.Exception ex)
{
PSO.MensagensDialogos.MostraAviso("Fail to execute the command.",StdBSTipos.IconId.PRI_Informativo,ex.Message);
}
}
}
}Step 4 - Permissions for operations
private void RibbonEvents_Executa(string Id, string Comando)
{
	switch (Id)
	{
	case CIDBUTTON1:
		if (Plataforma.Contexto.Utilizador.AcedeOperacao('EXT', 'mnuOperacao1'))
		{
			//Call action.
		}
		break;
	}
}private void RibbonEvents_Executa(string Id, string Comando)
{
switch (Id)
{
case CIDBUTTON1:
if (Plataforma.Contexto.Utilizador.AcedeAtributo('Documento', 'FA', 'EXT', 'CRIAR'))
{
//Call action.
}
break;
}
}