

How does the OAuth 2.0 authorization work?
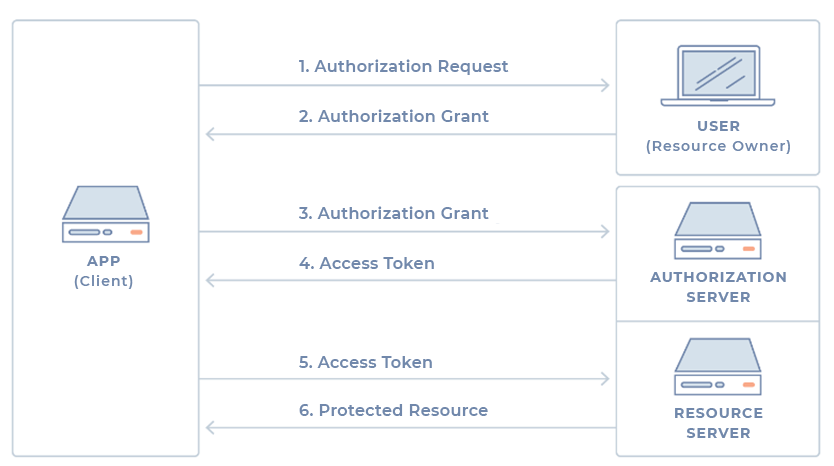
OAuth 2.0 is a standard authorization protocol that allows applications limited access to a user's account on a web service (HTTP). The protocol delegates user authentication to the service that holds the user account and authorizes external applications to access that user account. The protocol provides authorization flows for web applications, desktop applications, and mobile applications. The following describes the basic operation of the protocol from the perspective of an application developer. The protocol defines 4 roles: From the point of view of the application developer, the Web API that you want to consume fulfills both the role of resource server and the role of authorization server. This is why it is common to combine the two roles and call it a Service or simply an API. Typically the authorization flow for an external application will follow the following steps: In reality the actual authentication flow depends on the type of authorization grant that is used, however, this is normal OAuth conceptual flow. The various authorization grants available are discussed below. The type of grant used depends on which authorization method the application wants to use and, of course, which methods the Web API supports. There are 4 different types defined in the protocol, with different uses: Authorization code grant This is the most common type because it is optimized for server-side applications, where the application source code is not exposed and it is easier to keep the client secret confidential. It is a redirect-based flow, which means that the application must be able to interact with the user agent (the browser for example) and receive the authorization codes forwarded through that agent. Step 1 – Authorization code link First the user is a link similar to the following: The components of this link are as follows: Step 2 – User authorization When the user opens the above link, he must first authenticate himself to the service. Then you will be asked to allow (or deny) the application to access the requested scope. Typically this step is accomplished by a very simple form that describes what the application is asking for and lets the user choose whether to accept or deny that access. Step 3 – The app receives the authorization code After user authorization (previous step), the service redirects the user agent (the browser) to the redirect URL specified in the application registration, also sending an authorization code. Typically, the form of the redirect URL will look like the following: Step 4 – The app requests an acess token Next the application asks the API for an access token, passing it the previous authorization code and authentication details, including the client secret. The post will look like the following: Step 5 – The app receives the acess token If the authorization is valid, the API will respond with a message containing the access token. The response can look like the following: Implicit grant This type of grant is typically used in mobile applications and web applications (those that run in the browser), always when the confidentiality of the client secret cannot be guaranteed. It is also a redirect-based flow, even though the access token is given to the user agent to forward to the application, which makes that token more vulnerable as it can be exposed to the user and/or other applications on the user's device. In addition, the identity of the application is not authenticated, with the service relying on the redirect URL specified at the time of application registration. The normal flow behavior is as follows: the user is prompted to authorize the application, then the authentication server passes the access token to the user's browser which then passes it to the application. Step 1 – Authorization link First the user is presented with an authorization link that requests an API token: This link is essentially identical to the authorization code link (see previous grant), except that it requests a "token" instead of a "code". Step 2 – User authorization When the user opens the above link, he must first authenticate himself to the service. Then you will be asked to allow (or deny) the application to access the requested scope. Typically this step is accomplished by a very simple form that describes what the application is asking for and lets the user choose whether to accept or deny that access. Step 3 – The user agent receives the access token with the redirect URL After user authorization, the service will redirect the browser to the application's redirect URL and include in the URL the assigned access token: Step 4 – The agent follows the redirect URL The browser will follow this URL, storing the access token first. Step 5 – The application sends the script to extract the access token The application will then return in the URL a web page that should include a script to extract the access token from the URL. Step 6 – The access token is passed to the application Finally, the browser will execute the page script to extract the access token and then pass it to the application. At this point the application will be authorized. Resource owner password credentials grant This type of grant requires the user to provide their service access credentials (username and password) directly to the application, which will use them to obtain the access token. For obvious reasons, this is a type of grant that should only be made available by the authorization server if none of the other types are feasible. How it works is as follows. After the user provides the credentials to the application, the application will request the access token from the authorization server. The request (POST) will have a form similar to the following: When the credentials are correct, the server will return the access token to the application and the application will be authorized. Client credentials grant This type of grant provides a way for the application to access its own service account. This will be useful, for example, when the application wants to update its registry or access its own service account data using the API. The flow is as follows. The application requests an access token providing its credentials, client id and client secret from the authorization server. The request may take the following form: If the credentials are correct, the server returns the access token and the application is then authorized. When an access token expires, using it to make requests to the API will result in an "Invalid Token Error" error. At that point, if a refresh token was included at the time the access token was generated, it can be used to make a new access token to the server. Here is an example of such a request:OAuth Roles
Generic authorization flow
Authorization grant
https://myserver.com/v1/oauth/authorize?response_type=code&client_id={ClientId}&redirect_uri={CallbackUrl}&scope={Scope}
https://myapplication.com/callback?code={AuthorizationCode}https://myserver.com/v1/oauth/token?client_id={ClientId}&client_secret={ClientSecret}&grant_type=authorization_code&code={AuthorizationCode}&redirect_uri={CallbackUrl}{
"access_token":"{AccessToken}",
"token_type":"bearer",
"expires_in":2592000,
"refresh_token":"{RefreshToken}",
"scope":"{Scope}",
"uid":100101,
"info":{"name":"{UserName}","email":"{UserEmail}"}
}https://myserver.com/v1/oauth/authorize?response_type=token&client_id={ClientId}&redirect_uri={CallbackUrl}&scope={Scope}
https://myapplication.com/callback#token={AccessToken}
https://myserver.com/v1/oauth/token?grant_type=password&username={UserName}&password={Password}&client_id={ClientId}https://myserver.com/v1/oauth/token?grant_type=client_credentials&client_id={ClientId}&client_secret={ClientSecret}Refresh Token
https://myserver.com/v1/oauth/token?grant_type=refresh_token&client_id={ClientId}&client_secret={ClientSecret}&refresh_token={RefreshToken}